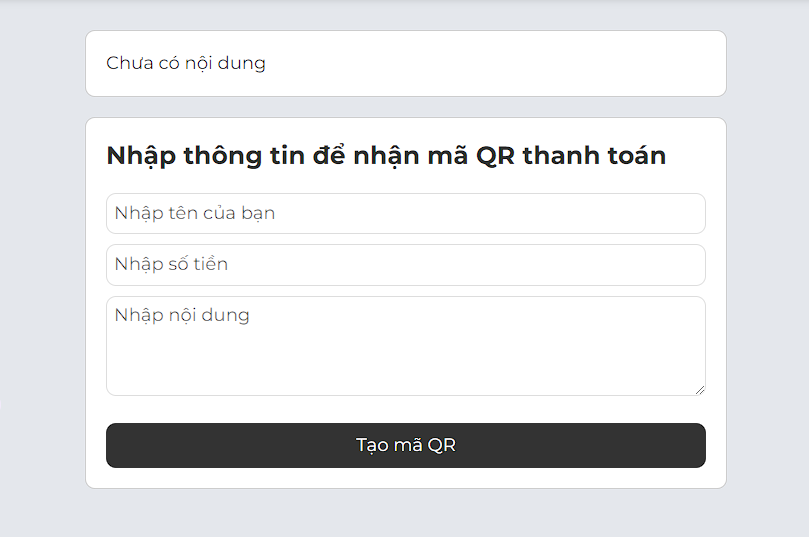
Tạo trang tạo mã QR thanh toán cho khách hàng
Khi khách hàng nhập vào họ và tên, số tiền, nội dung, họ sẽ tạo được mã QR để quét và thanh toán đến tài khoản ngân hàng của bạn
Code tạo trang tạo mã QR thanh toán
<?php
# Template Name: Chuyển khoản
get_header();
?>
<div class="form-bank" style="margin-bottom:20px;">
<div id="getpost">Chưa có nội dung</div>
</div>

<div class="form-bank">
<div class="form-bank-tit">Nhập thông tin để nhận mã QR thanh toán</div>
<form method="post">
	<input id="name" placeholder="Nhập tên của bạn" value="">
	<input type="number" id="money" placeholder="Nhập số tiền" value="">
	<textarea id="note" placeholder="Nhập nội dung"></textarea>
	<a href="#" onclick="bank()">Tạo mã QR</a>
</form>
</div>
<script>
function bank(){
	var name = document.getElementById("name").value;
	var money = document.getElementById("money").value;
	var note = document.getElementById("note").value;
	if (name != "" && money != "" && note != "") {
	const formatCash = n => {
	  if (n < 1e3) return n;
	  if (n >= 1e3 && n < 1e6) return +(n / 1e3).toFixed(2) + " nghìn";
	  if (n >= 1e6 && n < 1e9) return +(n / 1e6).toFixed(2) + " triệu";
	  if (n >= 1e9 && n < 1e12) return +(n / 1e9).toFixed(2) + " tỷ";
	  if (n >= 1e12) return +(n / 1e12).toFixed(1) + " ngàn tỷ";
	};
	document.getElementById("getpost").innerHTML = "Tên của bạn: "+ name +"<br> Số tiền: "+ formatCash(money) +"<br> Nội dung: "+ note + "<br> <img src='https://img.vietqr.io/image/<Ma ngan hang>-<So tai khoan cua ban>-print.png?amount="+ money +"&addInfo="+ note +"&accountName=<Ten chu tai khoan>'>";
	} else {
	document.getElementById("getpost").innerHTML = "Chưa có nội dung";
	}
}
// cho phep note toi da 50 ky tu
const textarea = document.getElementById('note');
textarea.addEventListener('input', () => {
  const maxLength = 50;
  const currentLength = textarea.value.length;

  if (currentLength > maxLength) {
    textarea.value = textarea.value.substring(0, maxLength);
  }
});
</script>
<style>
.form-bank{
	max-width:600px;
	margin:auto;
	padding:20px;
	border:1px solid #ccc;
	border-radius:10px;
	background:#fff;
}
.form-bank-tit{
	font-weight:bold;
	font-size:25px;
	margin-bottom:20px;
}
.form-bank input, .form-bank textarea{
	width:100%;
	padding:7px;
	border:1px solid #ddd;
	margin-bottom:10px;
	border-radius:10px;
}
.form-bank textarea{
	height:100px;
}
.form-bank a {
    margin-top: 10px;
    display: block;
    background: #333;
    color: #fff;
    text-align: center;
    box-sizing: border-box;
    padding: 10px;
    border-radius: 10px;
    width: 100%;
    text-decoration: none;
}
.form-bank img{
	width:100%;
	margin-top:30px;
}
</style>
<?php
get_footer();
Các bước thực hiện tạo trang chuyển khoản trên WordPress
Bước 1: vào thư mục theme mà bạn đang sử dụng, tạo một file đặt tên là chuyen-khoan.php sau đó dán toàn bộ code bên trên vào rồi lưu lại.
Bước 2:
<Ma ngan hang> – thay thành mã ngân hàng của bạn vào link này để lấy mã https://www.vietqr.io/danh-sach-api/link-tao-ma-nhanh
<So tai khoan cua ban> – thay thành số tài khoản ngân hàng của bạn.
<Ten chu tai khoan> – thay thành tên trên thẻ ngân hàng của bạn.
Bước 3:
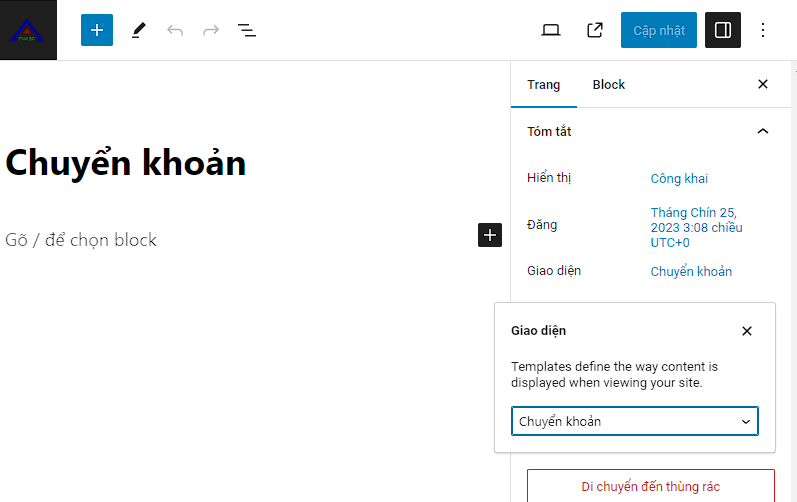
Vào mục Trang > Tạo mới trang > đặt tên “Chuyển khoản”, phần giao diện chọn “Chuyển khoản” rồi lưu lại là xong.
396 lượt xem | 0 bình luận
Đề xuất cho bạn

